


はじめに
Webアプリケーションを作成する際には必ずデータベースが必要になってきます。なぜなら、Webアプリケーションに表示されているデータは、すべてデータベースに格納されているからです。
本ブログでは、Struts2フレームワークでWebアプリケーションを構築していきたいのですが、その前に必要となるデータベース(今回はMySQL)のサーバー環境とクライアント環境をインストールしたいと思います。
サーバー環境は、実際にデータが格納されているデータベース本体のことです。
クライアント環境は、データベースに格納されているデータを操作する(テーブルを作ったり、見たり、消したりなど)ための環境のことです。
サーバとクライアントのインストール
- 下記コマンドを実行します。
$sudo apt install mysql-server mysql-client- バージョンを確認します。
$mysql --version
mysql Ver 14.14 Distrib 5.7.26, for Linux (x86_64) using EditLine wrapper
※「MySQL 5.7.26」をインストールすることができました。
初期設定
- 下記コマンドを実行して、MySQLの初期設定を行います。
$sudo mysql_secure_installation

Securing the MySQL server deployment.

Connecting to MySQL using a blank password.

VALIDATE PASSWORD PLUGIN can be used to test passwords
and improve security. It checks the strength of password
and allows the users to set only those passwords which are
secure enough. Would you like to setup VALIDATE PASSWORD plugin?

Press y|Y for Yes, any other key for No: n
Please set the password for root here.

New password:

Re-enter new password:
By default, a MySQL installation has an anonymous user,
allowing anyone to log into MySQL without having to have
a user account created for them. This is intended only for
testing, and to make the installation go a bit smoother.
You should remove them before moving into a production
environment.

Remove anonymous users? (Press y|Y for Yes, any other key for No) : y
Success.

Normally, root should only be allowed to connect from
'localhost'. This ensures that someone cannot guess at
the root password from the network.

Disallow root login remotely? (Press y|Y for Yes, any other key for No) : y
Success.

By default, MySQL comes with a database named 'test' that
anyone can access. This is also intended only for testing,
and should be removed before moving into a production
environment.

Remove test database and access to it? (Press y|Y for Yes, any other key for No) : y
- Dropping test database...
Success.

- Removing privileges on test database...
Success.

Reloading the privilege tables will ensure that all changes
made so far will take effect immediately.

Reload privilege tables now? (Press y|Y for Yes, any other key for No) : y
Success.

All done!
※「VALIDATE PASSWORD pluginを設定する」は「n」で、残りはすべて「y」で設定しました。adminのパスワードの設定も行っています。
接続の確認
- 下記コマンドを実行します。
$sudo mysql -u root -p※初期設定で設定したパスワードを入力します。
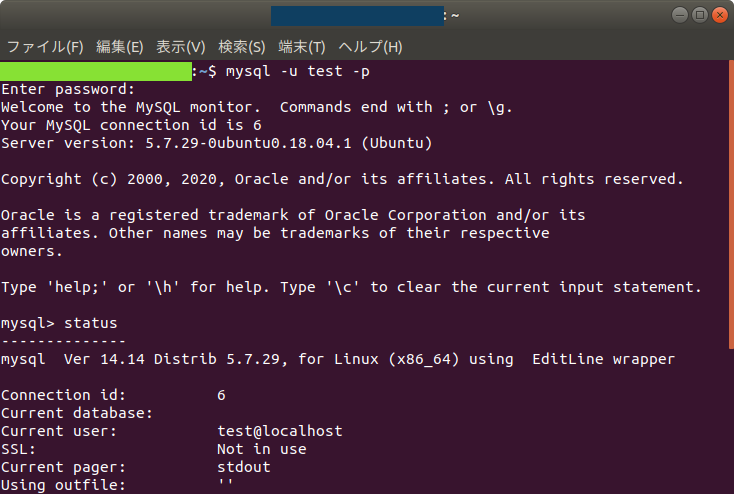
- 接続後、下記コマンドを実行します。
mysql> status
--------------
mysql Ver 14.14 Distrib 5.7.26, for Linux (x86_64) using EditLine wrapper

Connection id: 5
Current database:
Current user: root@localhost
SSL: Not in use
Current pager: stdout
Using outfile: ''
Using delimiter: ;
Server version: 5.7.26-0ubuntu0.18.04.1 (Ubuntu)
Protocol version: 10
Connection: Localhost via UNIX socket
Server characterset: latin1
Db characterset: latin1
Client characterset: utf8
Conn. characterset: utf8
UNIX socket: /var/run/mysqld/mysqld.sock
Uptime: 14 min 54 sec

Threads: 1 Questions: 19 Slow queries: 0 Opens: 113 Flush tables: 1 Open tables: 106 Queries per second avg: 0.021
--------------
※Server charactersetとDb charactersetがlatin1、Client charactersetとConn. charactersetがutf8となっています。サーバ側とクライアント側で文字コードが違うので、このまま使うとテーブル内の日本語が文字化けしてしまいます。
文字コードの変更
- 設定ファイルをバックアップします。
$sudo cp /etc/mysql/mysql.conf.d/mysqld.cnf /etc/mysql/mysql.conf.d/mysqld.org.cnf- 設定ファイルに2行追加します。
character-set-server = utf8
default_password_lifetime = 0
※[mysqld]セクションに追加してください。
※「character-set-server」はサーバ側の文字コードを設定しています。
※「default_password_lifetime」はパスワードの有効期限を無制限に設定しています。
- MySQLサービスを再起動します。
$sudo systemctl restart mysql
- 再度、MySQLに接続後、ステータスを確認すると、サーバ側文字コードもutf8となっています。
mysql> status
--------------
mysql Ver 14.14 Distrib 5.7.26, for Linux (x86_64) using EditLine wrapper

Connection id: 2
Current database:
Current user: root@localhost
SSL: Not in use
Current pager: stdout
Using outfile: ''
Using delimiter: ;
Server version: 5.7.26-0ubuntu0.18.04.1 (Ubuntu)
Protocol version: 10
Connection: Localhost via UNIX socket
Server characterset: utf8
Db characterset: utf8
Client characterset: utf8
Conn. characterset: utf8
UNIX socket: /var/run/mysqld/mysqld.sock
Uptime: 9 sec

Threads: 1 Questions: 5 Slow queries: 0 Opens: 105 Flush tables: 1 Open tables: 98 Queries per second avg: 0.555
--------------
まとめ
MySQL 5.7を無事インストールすることができました。
インストールが完了したことで、データベース本体やデータベースを操作する環境が整ったことになります。
最後までお読み頂きありがとうございました。


コメントを残す